Thứ Năm, 31 tháng 1, 2013

Pregatiri pentru martisor

          Cum anul acesta nu-mi permit taxa pentru targul de martisor, am facut mai putine modele si mult mai putine martisoare ca de obicei. Chiar daca nu pot merge la targ , nu pot insa sari peste luna Martie care mie personal imi place foarte mult. Va las mai jos cateva poze cu ce am pregatit. N-am apucat sa le pregatesc si sa le ambalez inca, insa m-ati innebunit cu intrebarile despre martisoarele mele, asa ca va las sa trageti cu ochiul :)


Traditia Martisorului

        Martisorul este strans legat de traditia romaneasca: el nu se intalneste decat in spatiul carpatic si in zonele limitrofe, la romani si la unele populatii invecinate, care l-au preluat de la acestia. Obiceiul este cu mult anterior crestinismului, stand in legatura cu scenariul ritual al anului nou agrar, celebrat primavara.
Pana in veacul trecut, martisorul se daruia copiilor si tinerilor - fete si baieti deopotriva - de 1 martie, inainte de rasaritul soarelui. Snurul de martisor, format din doua fire de lana rasucite, colorate in alb si rosu, sau in alb si negru, reprezinta unitatea contrariilor: vara-iarna, caldura-frig, lumina-intuneric, fertilitate-sterilitate.
Snurul era legat la mana, prins in piept si purtat, dupa zone, pana la Macinici, Florii, Paste, Armindeni, sau pana la inflorirea unor pomi fructiferi. Apoi era agatat, ca semn benefic, pe ramurile inflorite de macesi, vita-de-vie, visin, cires, se punea sub closca ori se agata la icoana. 

     Ziua scoaterii martisorului era marcata de o petrecere numita "bautul martisorului". Cu trecerea timpului, de snurul bicolor s-au legat monede de argint si de aur. In ziua de astazi, de acest snur se atarna obiecte artizanale, intruchipand diferite animale, flori, litere etc. Unele legende populare spun ca martisorul ar fi fost tors de Baba Dochia, probabil o veche zeitate agrara, care, ajunsa la varsta senectutii, moare si apoi renaste la echinoctiul de primavara.

     Martisorul ramane peste veacuri "funia anului", care aduna laolalta saptamanile si lunile in cele doua anotimpuri stravechi ale calendarului popular: vara si iarna, simbolizate de snurul bicolor. 

     La geto-daci si la latini anul nou incepea la 1 martie. Martie (mens Martius, "luna zeului Marte") era prima luna a anului. Astfel se explica numele lunilor septembrie (luna a saptea), octombrie (a opta), decembrie (a zecea). Calendarul popular la geto-daci avea doua anotimpuri: vara si iarna. Martisorul era un fel de talisman menit sa poarte noroc, oferit de anul nou impreuna cu urarile de bine, sanatate, dragoste si bucurie.

     Impletirea alb-rosie a snurului se regaseste in steagul calusarilor, la bradul de nunta, la podoabele junilor, la sambra oilor si in multe alte obiceiuri stravechi. Arheologii romani au gasit in asezarea preistorica de la Schela Cladovei, veche de 8000 de ani, pietre de rau cu urme de vopsea alba si rosie. Impletirea celor doua culori simbolizeaza geneza si regenerarea vietii.

     În prezent, mărțișorul este purtat întreaga lună martie, după care este prins de ramurile unui pom fructifer. Se crede că aceasta va aduce belșug în casele oamenilor. Se zice că dacă cineva își pune o dorință în timp ce atârnă mărțișorul de pom, aceasta se va împlini numaidecât. La începutul lui aprilie, într-o mare parte a satelor României și Moldovei, pomii sunt împodobiți de mărțișoare.

Thứ Ba, 29 tháng 1, 2013

Lectii Quilling

           Deoarece am fost intrebata de foarte multe persoane daca dau si lectii, m-am gandit ca ar fi timpul s-o fac. Datorita celor 3 ani de experienta in domeniu, sunt pregatita sa impartasesc cu voi  atat tehnicile de lucru si modelele invatate , cat si ideile noi.
          Toti cei pasionati de aceasta arta, copii (minim 8 ani) , parinti sau bunici , pot invata cum se confectioneaza o felicitare , un martisor, o bijuterie sau un tablou, pot invata cum sa faca un cadou unic pentru parinti , prieteni sau  pentru profesori. Puteti invata sa va faceti  singuri accesorii pentru birou, bijuterii unicat din hartie, rame pentru tablouri, miniaturi din hartie sau magneti pentru frigider .
          O lectie  dureaza 2 ore iar pretul / lectie este de 40 lei.
          Pentru inscrieri sau informatii ma puteti  contacta telefonic la nr: 0721709171 sau pe adresa de e-mail: cristina.pdg@gmail.com

         Pentru lectiile ONLINE, procedeul este urmatorul. 
        Clientul ma va contacta telefonic sau prin e-mail cu specificatii asupra lectiei dorite si adresa sa. Va trimite banii pentru lectie prin mandat postal , iar eu in momentul in care am primit banii,  voi trimite prin posta materialele necesare confectionari obiectului respectiv, iar prin e-mail poze cu etapele de lucru si informatii necesare.
        Mentionez ca pentru lectiile online pretul se percepe in functie de lucrare.
         Pentru lectii urgente, voi percepe o taxa de 5 lei, mai ales daca voi avea altceva in  lucru la momentul respectiv.
        Datele de contact le aveti mai sus.


         Happy Quilling!

                 Cristina

Thứ Hai, 28 tháng 1, 2013

Graphic Quilled Cartoon Picture - Walt DIsney's Thumper from Bambi

quilled picture quilled landscape bambi thumper walt disney quilled art graphic quilling
I have quilled cartoons before using both landscape quilling (A Lion Share of Love) and graphic outline quilling ( Tinkerbell, Twittypating and Muddled Mutt). This quilled picture of Thumper  follows from Bambi  for which I adopted my own style of graphic quilling in which I have used the strips like you would use a pencil.

The direction of the small strips create the illusion of the contours along with dark and light colors which give the depth.

I am thrilled with the fact that Thumper's bold innocence has come out well through the twinkle in his eyes.

There is not much I can give by way of instructions as it only involves pasting the strips. You can refer to my tips here in which I have tried to say it all. Since that tutorial, I have stopped pasting on the print out directly since the pencil marks can show through. I transfer the image by keeping the backing under the print out and tracing with a thin embossing stylus. I use the embossed side to see the image clearly. If the lines are seen I cover it up by gluing strips. Nature is never perfect. In fact the diversity is achieved through slight imperfections , hence,  I don't try to get my images or flowers perfectly symmetrical as I love to imitate nature. Believe you me, I am no great artist!! I discovered that I had even a semblance of artistry only after I started quilling less than a year back. So, those of you who think it is tough, just jump in and try it. You will be surprised at what you discover!!

Come tell me what you think. I would love to have your feedback.

Thứ Sáu, 25 tháng 1, 2013

New Quilling Technique Tutorial - Coil Rose


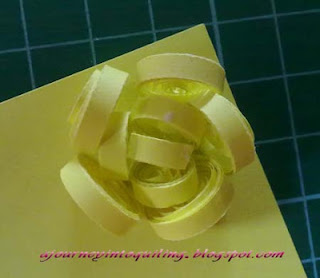
This quilling tutorial or quilling instructions is a new technique for making quilled roses using basic coils and is very easy yet looks quite beautiful. I developed this method for my quilled Thai Pongal Card  design. These can be made using tight coils as well but the strip length needs to be increased by 75% .

METHOD
Make 5 or 6 loose coils from A4 length' 3mm strips.
3 coils from 2/3 A4 3mm strips.
1 or 2 coils from 1/3 A4 3mm strips.
The coils should not be too loosely coiled and should hold the shape without sagging in the middle.
 Now take a sheet of paper, the same color as the coils, and glue them at the point where you glued the coils shut. Glue them upright, slanted slightly outwards as shown above.

Now glue the rest of the largest coils in a circle slanting outwards as shown above.

 Now take the 3 smaller coils and glue them inside the larger circle of petals  slanted slightly outwards as shown above.

 Now take the smallest coils and glue either 1 or 2, depending on the space available, in the middle to complete the rose. 
 Next, apply glue with a toothpick to the areas of the petal that touches another petal and glue them so that the rose is firm and to help hold the shape.


 Now cut out the rose so the paper  is not visible. You can use a small sharp pair of scissors for this.

Now cut 5 or 6 , small leaf shapes of about 6mm height.
 

 Keep each shape on a semi soft surface or on thick foam and with the blunt end of your quilling tool, rub it gently in circular motion till the pointed end curls upwards.
 The results should look like the above.
Now fold the blunt end of the leaf towards the curled side a tad and apply glue to the fold, turn the rose over so you see the bottom. .
Glue it at the point where two petals meet as shown above, repeat for all 5 or 6.
Once completed turn the rose up and with the forceps shape the leaves by curling the point outwards  so that it looks natural.
Your Done!! An easy but beautiful quilled rose!!


Thứ Bảy, 19 tháng 1, 2013

Quilled Celtic Knot - Quilled Eternal Circle, Shamrock and Triquetra

This quilled Celtic knot is made using multi-strip quilling and beehive quilling. The combined symbolism is packed with  meaning.

The Eternal Circle- The interlacing lines of the Celtic Knot stands for "no beginning, no ending, the continuity of everlasting love and binding together or intertwining of two soul or spirits."

Trinity Knot, also known as a Triquetra. -  Christians believe that the three points represent the three elements of the trinity: the Father, the Son, and the Holy Spirit (or Holy Ghost). To the ancient Celts it symbolised the  earth, air, and water. On a more spiritual level, it has also been known to symbolize life, death, and rebirth.

The Irish Shamrock is the traditional symbol of the Trinity.

Completing this was a study in patients and was rather difficult to do. The interlacing lines got me tied up in knots myself , but in the end I managed to complete it. The biggest hurdle was to get it to stick to the backing. Kept getting stuck to my fingers and everywhere else but!! I have managed to get the beehive in neatly though.

Tips for beehive quilling is available here.

Thứ Ba, 15 tháng 1, 2013

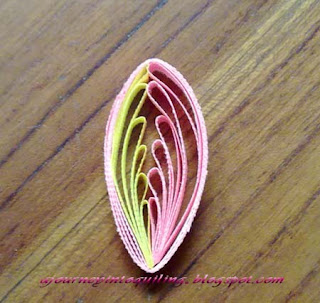
New Quilling Technique Tutorial - Comb Quilled Two Tone Leaf / Petal


This quilling tutorial is a new technique for making a two color comb quilled or mini-loop leaf . I have not seen these leaves used by anyone else. I have used these leaves for the first time in Floral Cascade and then in my Thai Pongal Card.I developed this technique when playing around with comb quilling and thought I would share it with you all.

This leaf/ petal  can be made freehand or by using a comb. I have given both methods here.  Try to look at the pics and understand the method before reading the instructions.

Comb Method

1


 Take a large comb (use the side with a wider gap between the teeth) and a 3mm strip of your choice and make a loop around the last tooth and glue it shut.

2


 Now thread the strip under the next tooth and bring it back up as shown in the pic above.

3

 Loop it back towards the end of the comb and glue the strip at the very edge with a tiny bit of glue.

4

 Next, fold it forward as shown in the 1st pic above making sure it is aligned on top of the other loops you have made and thread it under the next tooth as shown in the 2nd pic above.

Continue making about 5 to 6 loops (the size and number of loops will depend on the size of the comb. Large combs with more space between the teeth will give you larger leaves).

5

 Remove from comb and leave the balance strip to wrap around the leaf or tear off excess.

6

 Quill another half leaf in another color and get the same number of loops. Then glue them together as shown above then glue another strip you want to use to wrap round the leaf, to the bottom as shown.

7


Now apply a wee bit of glue to the edge of each loop of one color and glue it to the loops of the other color gently and wind the strip around to encircle the leaf.

That it folks!!


Manual Method

The leaves made by hand will look less symmetrical like it does in nature. To make sure that the loops of the two halves  are the same sizes both strips should be shaped together.
 Make a loop holding both strips together. Do not paste the strips together.
 Fold the loop forward at the place the loop starts.
Make the second loop so that it overhangs the 1st loop. Size it by using your third finger to push it over the 1st loop as shown.
 Once again fold it forward and create the 3rd loop and push it over the second loop as shown to size it. Continue in this manner till you reach the size of the leaf/ petal you desire.
 Separate the 2 strips and it should look like the pic above.
 Now apply a tad of glue at the top (not the tip) of each fold as shown in the picture and you have made the 2 halves of your leaf/petal.
This is what your half leaves will look like.
 Now glue both the half leaves at the bottom as shown.
 Apply glue to the top of each loop of one of the halves as shown.
Glue the loops as shown to make the leaf. do not squash it. Gently hold them till they get stuck and then encircle the leaf with another strip of your choosing and your done.

Just a tiny request to those of you who use this leaf , please give a link to this blog so that others may learn too.

A Quilled Greeting For Thai Pongal

This post is to wish all my Hindu  visitors Happy Thai Pongal. May you find fulfillment in everything you do. Just as the suns rays shines upon everyone irrespective of nation, cast or creed, may happiness surround you no matter the circumstances.

A closer look at the design
 I have used the Two color half comb leaf here and a rose made from loose coils.

The tutorial for the dual color looped leaf is here.
Quilled Coil Rose tutorial is here.

Thứ Bảy, 12 tháng 1, 2013

Decor pentru o macheta

      Cum nu am nimic nou inca, m-am gandit sa va postez cateva piese lucrate in decembrie pentru o prietena , Andreia Martinescu. Nu stiu daca va aduceti aminte , Andreia a luat premiul I la un concurs de scenografie in 2011 cu o macheta superba . Aici aveti cateva detalii:  " O mana de ajutor "
      O sa va las mai jos pozele cu piesele facute de mine. Nu am primit inca imagini cu macheta completa, dar o sa le postez cand le voi primi.


Aici aveti pozele cu macheta completa,  sper sa va placa ! 


Labels

abstract art Accessories Adult English AGNES ALIEN AMIGURUMI amirugumi Animale Art AVES Awards Baby baby crochet Baby learn bag Ballet Bun Cover BARRIO SESAMO basic shapes Bead beehive quilling belts Bijuterii Birds Blog Hop BLUSAS books Botez bracelet BUHO Butterfly CABALLO CACHECOL cake candles card Cards cartoon CASACO INFANTI CASAQUINHO EM CROCHE CERDO CHAPEU Christmas Christmas quilling clay COCO coloring CONEJO CORDERO Coronite Craciun Craft crochet crochet pattern Crosetate cross stitch CUERPO BASICO Curtain Cutii Decoupage Doll Dolls - Búp bê drawing Drawing - Vẽ dress Dulciuri 3D earring Easter edging Eggs ELEFANTE Embroidery Embroidery - Thêu Events EXTRATERRESTRE fabric Felicitari Felt FINN Floral arrangements - Cắm và bó hoa Flori 3D flower frame flowers crochet Flowers crochet - Móc hoa Folding boxes - Gấp hộp Folding paper food Funny GALLINA Gang tay - Tất garden GATO Ghivece Giầy - Dép Gifts Gói quà - gấp nơ Gối cho bé GRÁFICOS Graphic Quilling Halloween Hats - Mũ holiday crafts Home decor - Trang trí nhà ICE AGE Insect Invitatii Jesus Jesus Christ Jewelry kirigami knitting knitting pattern knot Knot - Tết dây La multi ani Làm đẹp làm đồ chơi từ gỗ landscape Lectii Quilling Macrame Magazine Magneti Frigider making flowers Making toys MARIPOSA Martie Martisoare Marturii Botez Marturii Nunta MEUS TRABALHOS MI VILLANO FAVORITO Miniaturi Móc đường riềm Móc khăn trải bàn MONSTRUO MUEBLES Multi-strip MUÑECA Nature Scenery necklace Nghệ thuật Nghệ thuật cắt giấy Nghệ thuật vẽ trên kính Nhà đẹp Nunta Origami Ornamente brad OSO Oua Pachwork painting Painting - Sơn màu PAJARO Paper Paper Art paper cut Paper Flowers Paste Patchwork PATRONES PERSONAJES Pillows - Gối plastic Play and learn for baby POLLO poncho Quilled animals quilled art quilled berries Quilled design quilled flowers quilled hollow egg quilled leaves Quilled petal Quilled Picture quilled portrait Quilling 3D Quilling paper Reciclabile recycling rings Scarves - Khăn Semne de carte sewing sewing detail shawls silhouette SILLA snood Snowflake sweater tablecloths Tablouri Targuri Handmade TIEMPO DE AVENTURA tips TRICO Tutorial Tutorial video Tutoriale typography Valentine's Day Valentines Day vector art Video weaving Wedding Wreath