Last year I posted some tutorials and quillings tagged under Christmas quilling and though I did a tutorial on 3d pine cones I did not post a tutorial on the leaves as I did not really like the way they turned out. But this year I have figured out a better way that makes them look more real especially if you use thicker paper. I have used 80 gsm as that is what is available to me.
METHOD
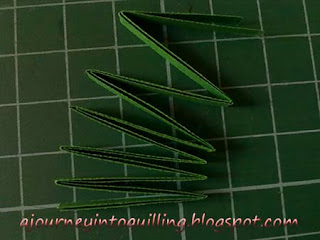
Make a long stem as in my tutorial here. You can insert a thin gauge wire if you want your pine leaves to be flexible. Stiffen it by coating with glue and let it dry well.Take a few 3mm strips and fold them like a fan as shown above. The length will represent the length of the leaflet, so make sure you fold all to the same size.
Tear the fan so you have a V shape for each leaf and then cut length wise about 2mm short of the end. Shape the edges so they are pointed like pine leaves. Shape it like the real leaf for a more realistic look.
Now insert your quilling tool in the middle of the uncut edge and curl the strip around the edge as shown above. this helps the fringe to spread out. In this method, you are basically making a fringed flower using the 3mm breadth of the strip.
Make a lot of these as you are going to use between 4 to 5 for each ring of leaves.
Now take each leaf segment and glue it onto the stem so it has the leaves spreading right around as shown in the pic above. Make sure you glue at the same place like you glue petals.
The pic above gives you an idea of how you should glue it. Use about 4 or 5 leaf bundles depending on the density of the leaves required.
Now continue in the same fashion, gluing the leaf bundles around the stem at close intervals. Make sure the consecutive rows of leaves are glued between the previous row's leaves as you do with multilayer petals. Look at the above pic for guidance. When you reach the length you require, flatten the stem and glue two leaf bundles to complete the tips of the leaves.
If you require the leaves to branch make sure you construct the branched shape with the stems before you glue in the leaves.
Above is a sample of the finished pine branch.
I look forward to reading your comments as always. Good luck!!


.JPG)


0 nhận xét:
Đăng nhận xét