Thứ Sáu, 27 tháng 9, 2013

Quilled Doodle Wall Frame

Everyone's doodling so I practiced some of my graphic quilling skills and created this doodles canvas with my favorite medium, paper strips!! I used black card strips for the straight line geometric doodles.

 Well you can use quilled doodles on your cards too if you like and unlike flowers it is quick to make and looks modern. I have used 3mm strips and 4 colors, namely, maroon, orange, biscuit and black.

The shapes include basic shapes, multi strip shapes and beehive quilling which I always try to use wherever possible.

Well I hope you like this and are spurred to quill your own doodles!! Love to have your feedback.

Thứ Năm, 19 tháng 9, 2013

Quilled Nature Landscape Painting - Flowing River

It has been a while since my last post, but here I am once again with a quilled riverside landscape. This time I have tried out chrismas trees .

For this project I have used several techniques and concentrated on getting the shapes to fit the element it represents. I think you need not stick to basic shapes but  hand make any shape that you think represents the item best.

The whole frame is 3mm thick  is 8x11 and I have not layered it to create dimension. I have used dark and light and size to create depth just like in a painting.

I have also tried quilling clouds for this one and have used grey, blue and white to give depth to the clouds.

For the water I have just used torn strips the same as  described in Tree & Water. The addition of white gives it a beautiful effect.

I am unable to give a step by step description on how it is done as I change my method and shapes from scene to scene and can't quite tell you what I did once it is done, but what I can tell you is that I have not quilled any basic shapes for this project except for the trees in the horizon for which I have used beehive quilling like I did for Flower Fields  and Quilled Tree. Most of the others are hand folded or rolled.

When an idea hits me I just draw the element like for example the tree canopy on a rough sheet and then take a few strips and follow my idea and see how it looks from a distance. If I do like it I will use that idea in the scene. Further, I would use different basic shapes for each tree so that the dissimilarity is clear.


Would love to know what you think as always as you are my inspiration.

Thứ Tư, 18 tháng 9, 2013

Colier Mustata ...

     Colierul cu mustata este foarte cautat in ultima vreme, mai ales de adolescenti. Surprinzator este faptul ca desi pare foarte simplu de realizat , nu se lucreaza usor. Trebuie sa iei in considerare ca orice milimetru conteaza si marimile diferite ale laturilor mustatii pot cauza disproportii batatoare la ochi.
     Asa ca dupa cateva incercari, desigur in urma unei comenzi, mi-au iesit cateva coliere, spun eu destul de acceptabile. Sper sa va placa. Mai am cateva modele pe care le voi atasa pe parcurs.
     Dimensiunea mustatii este de 9,5 x 3,5 cm. Sunt lacuite pentru protectie, iar snurul colierului are 73 de cm.

Pret: 15 lei/buc


Happy Quilling!
Cristina

Thứ Sáu, 13 tháng 9, 2013

De la inima la inima....

          Am pregatit o noua serie de bijuterii cu  inimioare :). M-am gandit ca 1 serie pe an ajunge :)). Deci , am cumparat o baza de lemn care de mult imi facea cu ochiul , pe care am ornat-o cu fasiute de hartie de 3 si 1,5 cm in tehnica quilling. Modelul poate o sa vi se para banal,  insa spatiul nu mi-a permis altceva.
         Inimioarele au dimnsiunea de 7 x 6 cm si sunt lacuite pentru protectie. Sper sa va placa.
         Stocul este limitat, asa ca pentru comenzi ma puteti contacta la nr de tel: 0721709171, sau pe adresa de e-mail: cristina.pdg@gmail.com

Pret: 18 lei /buc


Baza de lemn pe care am lucrat, vopsita in culori acrilice simple si sidefate.


Thứ Ba, 10 tháng 9, 2013

Quilled Flower Frame - Tree Nymph Butterfly Among Butterfly Flowers

I wanted to try my hand at using shaped pegs for petals so I decided to do this frame for which I have used  one shaped  peg for the lip petal. The rest of the petals are basic tear shaped with spiral centers. The flower is shaped like a butterfly and the stamens are curved above the flower.

here's a closed look:
For the stamens, I have cut a 3mm strip in 4,  lengthwise.

Shaping The Petal
I used 3, 3mm strips of dark and light purples to make the pegs. When rolling I ensured that it was not too tight so that it is easier to shape. First I rolled the coil between thumb and forefinger as detailed in my tutorial on shaping pegs and made a convex shape which I shaped  to a tear drop by pinching on end; It's much easier to shape the peg, after pushing the peg out to a convex .

Once I had the petal shape, I pushed the coils near the pinched end up to convex it while pushing the coils at the rounded end down. (See pics)


lip petal

For the leaves, I made curved, moulded leaves using marquee shapes. You can see the shadow of the curve in the close up below.
The fruit is made by making cup shaped pegs which I have detailed in an earlier tutorial. For more rounded cups, thinner strips should be used.


For the butterfly, I have stuck to basic shapes and the body stripes are created by adhering  strips of the relevant colors.
I have made a curved cone for the stomach and have glues the butterfly so the wings are at about 30 degrees to the horizontal  and not flat on the surface. The butterfly is elevated above the level of the flowers.

The whole arrangement is created by gluing the different elements  at multiple levels in order to get a 3D  effect.

 I generally dislike the side view pics as I dislike the tapering appearance created by this perspective. Hence I do not post this view to show  how the flowers are laid out.

I would love to have your feedback.  I have been remiss in visiting your  blogs  to admire your work  as I have very limited  time on the net at present, but will drop by your blogs as soon as I get a chance. Till then Happy Quilling to you all.

Thứ Sáu, 6 tháng 9, 2013

Toate-s vechi si noua toate...

    Am revenit  cu ceva vechi pe care l-am lucrat doar o data insa a avut mare succes cand l-am facut si tare vroiam sa revin la model. Un magnet de frigider, lucrat in tehnica quilling acum 2 ani dupa o miniatura a talentatei  Natilde Andrade (Nati) care mi-a ramas la suflet. Magnetul are dimensiunea de 9,5 cm x 10,5 cm si este lucrat cu carton de 220gr si hartie de 130gr , ambele cumparate de la Casa Retro . Sper sa va placa .
    Pentru comenzi, ma puteti contacta la nr de tel : 0721709171,  sau pe adresa de e-mail: cristina.pdg@gmail.com

Pret: 10 lei / buc


Ambalati si pe picior de plecare :)


Thứ Tư, 4 tháng 9, 2013

New Quilling Technique Tutorial - Folded Strip Leaves 2 & 3

This quilling tutorial covers 3 types of leaves using the same method. If you look carefully one leaf has the loops glued to the sides, while the other has the loops glued to the mid vein. The appearance of the leaf is very different though the same method is used. No special tools are required.

Check out my other folded strip tutorials here , here and here.

Broad Leaf Long Grass

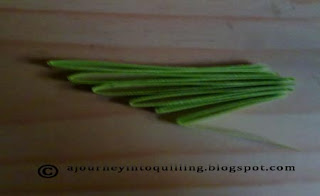
Take an A4 size 3mm strip and fold it as shown below so that it tapers like grass , more on one end and less on the other.

Now glue another strip to the long side as shown in the pic below.


Then apply glue to the top of each loop as shown in the pic.

Now glue the strip and allow to dry till the strip does not come off when you pull. Once adequately dry , pull the strip downwards very slightly so that the long longest loop curves a tad and the rest of the loops open out. Glue the strip to the rest of the leaf while holding this position.

Encircle the leaf a second time and this time extend the strip a tad beyond the longest loop to get a pointed tip like long grass  and you're done.


Strip Leaf

For this leaf, keep 2 strips together and pull them apart.

Adopt the same method as above but make sure you taper the leaf less and when curving the loops open, ensure you pull so that it is like a semi circle with the bottom straight as shown. In this case, the straight side will be the longest loop. when pulling keep it as straight as possible. Pinch the other end to straighten the bottom line which is the mid vein of the leaf. Here the loops are glued to  the side of the leaf.

If you want the leaf like the pic below where the loops are glued to the mid vein you should bow the longest  loop and straighten the loop side as shown below. Its only a matter of shaping the leaf and deciding which side you want to keep straight.

Now glue 2 halves to complete the leaf and you are done!!


I would love to have your feedback and comments once you try it out.

Labels

abstract art Accessories Adult English AGNES ALIEN AMIGURUMI amirugumi Animale Art AVES Awards Baby baby crochet Baby learn bag Ballet Bun Cover BARRIO SESAMO basic shapes Bead beehive quilling belts Bijuterii Birds Blog Hop BLUSAS books Botez bracelet BUHO Butterfly CABALLO CACHECOL cake candles card Cards cartoon CASACO INFANTI CASAQUINHO EM CROCHE CERDO CHAPEU Christmas Christmas quilling clay COCO coloring CONEJO CORDERO Coronite Craciun Craft crochet crochet pattern Crosetate cross stitch CUERPO BASICO Curtain Cutii Decoupage Doll Dolls - Búp bê drawing Drawing - Vẽ dress Dulciuri 3D earring Easter edging Eggs ELEFANTE Embroidery Embroidery - Thêu Events EXTRATERRESTRE fabric Felicitari Felt FINN Floral arrangements - Cắm và bó hoa Flori 3D flower frame flowers crochet Flowers crochet - Móc hoa Folding boxes - Gấp hộp Folding paper food Funny GALLINA Gang tay - Tất garden GATO Ghivece Giầy - Dép Gifts Gói quà - gấp nơ Gối cho bé GRÁFICOS Graphic Quilling Halloween Hats - Mũ holiday crafts Home decor - Trang trí nhà ICE AGE Insect Invitatii Jesus Jesus Christ Jewelry kirigami knitting knitting pattern knot Knot - Tết dây La multi ani Làm đẹp làm đồ chơi từ gỗ landscape Lectii Quilling Macrame Magazine Magneti Frigider making flowers Making toys MARIPOSA Martie Martisoare Marturii Botez Marturii Nunta MEUS TRABALHOS MI VILLANO FAVORITO Miniaturi Móc đường riềm Móc khăn trải bàn MONSTRUO MUEBLES Multi-strip MUÑECA Nature Scenery necklace Nghệ thuật Nghệ thuật cắt giấy Nghệ thuật vẽ trên kính Nhà đẹp Nunta Origami Ornamente brad OSO Oua Pachwork painting Painting - Sơn màu PAJARO Paper Paper Art paper cut Paper Flowers Paste Patchwork PATRONES PERSONAJES Pillows - Gối plastic Play and learn for baby POLLO poncho Quilled animals quilled art quilled berries Quilled design quilled flowers quilled hollow egg quilled leaves Quilled petal Quilled Picture quilled portrait Quilling 3D Quilling paper Reciclabile recycling rings Scarves - Khăn Semne de carte sewing sewing detail shawls silhouette SILLA snood Snowflake sweater tablecloths Tablouri Targuri Handmade TIEMPO DE AVENTURA tips TRICO Tutorial Tutorial video Tutoriale typography Valentine's Day Valentines Day vector art Video weaving Wedding Wreath