Thứ Tư, 31 tháng 7, 2013

Quilled Flower Frame - A Bouquet of Roses

Its been ages since I quilled something as easy as a rose, so I thought I'd make a bunch  of 3d quilled roses and here it is .... a bouquet of blood red roses with one, white one, to break the monotony.

The paper was a bit smooth and slippery so I crumpled it for an antique look. The roses are on tubular stems and not on wire stems as I wanted it to be thick.

On hind sight, I think I should have gone for the darker green for the leaves, however, I have made  3d leaves and then stuck it to the stem. The leaves are slightly fringed and fan folded.

For the buds, I made a bell shape as in my tutorial in order to make it look like a bud instead of a cone.

I am looking forward to reading all your comments as always.

Thứ Ba, 30 tháng 7, 2013

Marturii Suport Card Copacel

      Am pregatit  ca marturii pentru nunta , un copacel dragut pe suport de poslistiren , invelit cu muschi, in ghiveci de ceramica, Florile si funda pot fi schimbate la culoare dupa preferinta.
      Dimensiunile pomului sunt: 13 cm inaltime, ghiveci cu dimensiunea de 2,9 x 2.6 cm.
      Pentru comenzi ma puteti contacta la nr de tel: 0721709171 sau pe adresa de e-mail cristina.pdg@gmail.com.

Pret: 9 lei/buc (reduceri pt cantitati mari)


Thứ Tư, 24 tháng 7, 2013

Napkin paper Holder

       Napkin paper holder, sau pe romaneste inel din hartie  pentru servetele. Nu stiu daca vi s-a mai intamplat , dar mie mi se intampla des sa nu-mi gasesc cuvintele  in limba materna si sa-mi vina in minte mai repede denumirea  lor in alta limba. Ar fi logic daca as trai in alta tara si nu as mai vorbi zilnic limba romana, insa asa ... e ciudat!!
       In fine!! Deci am pregatit un inel pentru servetele pe care il puteti folosi atat pentru mesele in familie dar si pentru cele festive. Pentru nunta sau botez este de efect si economic la pret. Puteti jongla cu paleta de culori dar si cu accesoriile, folosind glitter, praf de embosat, margele, paiete etc. Sper sa va placa!


Cristina

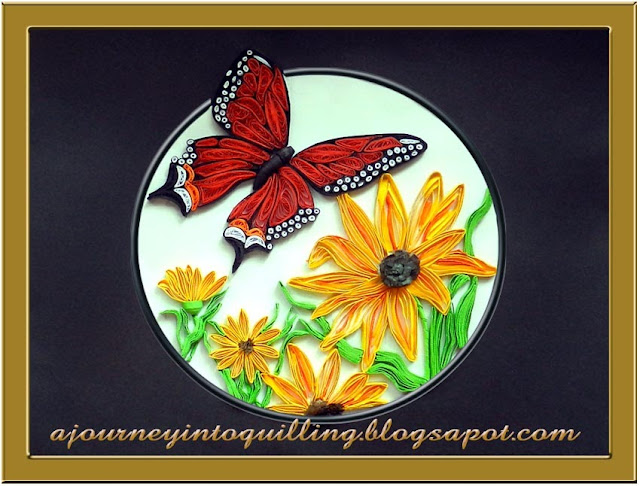
Graphic Quilled Picture Frame - Sunflower and Swallowtail Butterfly

I have been meaning to blog this graphic quilled picture of a butterfly among sunflowers for a long while but never got down to it till today.

As you can see I have graphic quilled the flowers while the butterfly is made with basic shapes. The leaves are made with fan folded strips. The flower centers are fringed flowers.
 I have used similar techniques for
Bird in a Bower
Tinkerbell
Bambi
Thumper, to name just a few of my graphic quilling projects.

The design was inspired by a free pic available on the net, which I decided to quill. I think  this type of quilling is good for cards too, and would be different from the quilled card that everyone makes.

I would love to have your thoughts on this project.

Thứ Hai, 22 tháng 7, 2013

Flamenco

          Va las mai jos, un tablou facut la comanda,  pentru un interpret de flamenco.
          Tabloul este realizat integral din hartie, cu rama din carton embosat de 220g cumparat de la Casa Retro . Rama tabloului are la exterior dimensiunea de 35cm x 30cm  cu  grosimea de 2 cm . Lucrarea este ralizata in tehnica quilling cu fasii de hartie late de 3mm si lungi de 29cm din hartie de 130g cumparata tot de la Casa Retro . Spatiul aferent lucrarii este de 31cm x 25cm.
           Pentru  informatii sau comenzi , ma puteti contacta la adresa de e-mail si nr de telefon existent pe blog.

Pret: 100 lei (vandut)


Happy Quilling!
Cristina

Thứ Năm, 18 tháng 7, 2013

New Quilling Technique Tutorial - Shaping Pegs For 3D Flowers & Butterflies


This tutorial is on how I shape pegs (tight coils) to make receptacles for flowers, thorax and abdomen for butterflies. You do not need special molds or tools and as you can see you can get cone or bell shapes very easily.


To learn fast, read this tutorial in full to get  an idea of the steps and concepts then read it again while you follow the steps creating the item. Then try the item out without looking at the tutorial and you will remember it without effort.


Tools That Are Useful

I find the above tools invaluable for quilling small items and for shaping pegs. The narrow tip glue applicator is an empty fabric 3d paint applicator which I filled with glue. When I want just a tad of glue I merely use gravity and do not press the bottle. When not in use cover the tip with wet sponge or a cap.

A toothpick sharpened with a blade is useful for rolling the pegs without large holes in the center.  I sharpen it to increase friction so that I can turn the toothpick to roll the strip . Roll the toothpick over the end of the strip, applying a little pressure so that the strip rolls around the tip, then roll the strip around the sharpened end using thumb and forefinger. Once a portion of the strip is wound round the toothpick you can roll the toothpick to finish the peg and glue it. Ensure that you do not wind it too tightly. What is most important is the tension which should be neither too tight or too loose. If you find the inner coils are too tight allow a minute unwind and then glue it.

You will need to practice a bit if you are using a toothpick. You can even wind it with your fingers to complete the peg. The toothpick is only required to ensure the inner hole is small as in the pic below.
Always use 2 strips to make the peg for stronger more shapely objects. Once you have rolled the peg and glued it, roll over the top with your quilling tool to flatten it uniformly.

Now to shape it. Slightly concave the peg with the ball of your finger, then hold the peg between thumb and forefinger as shown.

Now press the peg a little and move your forefinger forward and backwards and as you do that, the peg will start cupping downwards.
Then move you fingers a tad lower on the cupped coil and repeat the action till about 1mm of each coil is visible.


 Now if you want a bell shaped cup,insert a cotton bud or a round ended cylinder that fits and you can keep it on top of a foam and  make anticlockwise turns while pushing it gently down. The anticlockwise movement makes it unwind and rounded so do not over do it as it will come out. When you push it down it will round the end like the pic.

If you want cones you can push the coils out with a narrow cylinder and the roll it clockwise slightly to tighten the coils.


Another point of note is the breadth of the strip. Thinner 1mm or 2mm strips make more rounded small objects while 4mm and over strips will make more cone shaped small objects.

Butterfly Body
If you want a cone shaped object which is rounded on top like in the pic for butterfly bodies, then you

 make the coils and first push the bottom part down with a toothpick like a cone and then roll the top between your fore fingers and thumb with short pushes forward (clockwise) and long pulls backwards.The long pulls will round the top coils while the short pushes will balance the tension.

Or, you can keep the peg on a soft surface and push it with your finger to make a cup shape and then once the top is rounded you can gently push the bottom with a toothpick to make a shape resembling a funnel. Then you can elongate the rounded top slightly by rolling a cotton bud around the surface from the inside.

Curved Cone

Make a cone or rounded cone and then work a toothpick or cotton bud from the inside rubbing one side  out slowly forward and backwards, so that the coils are exposed more on one side to curve the cone.


 Make sure you apply glue on the inside and allow it to dry well before using your shapes. If you have glued them well you can cut them open once dry and they will still hold the shape. Always use a paintbrush to apply the glue uniformly.

 The best way to learn is to make a few pegs and experiment how it shapes with various movements both on the inside and outside of the cones. You can always use molds or plastic palettes to make rounded shapes.

The use of cotton buds to shape has the advantage of allowing you to get any size by wrapping more cotton around it. The foam prevents the bottom from getting pushed out while rounding it.

Keep checking your coils to ensure that you have not pushed out any area too much and each coils exposes only half to 3/4ths of the breadth.

I hope this has been helpful. If it was, I would love to hear your comments.


Chủ Nhật, 14 tháng 7, 2013

Scrap - Tentative

           Incerc sa-mi deversific putin lucrul , sa invat si alte tehnici, e bine sa stii cat mai multe. Cu toate ca se spune : putin si bun! Dar ce , strica daca e mult si bun??
           Urmatoarea felicitare am facut-o in urma unei comenzi fulger, gen de azi pe maine. N-am avut prea mult timp sa aleg un model mai elaborat, asa ca am facut ceva simplu. Sper sa va placa.
          Felicitare are dimensiunile de  15cm x 21 cm.

Pret: 25 lei ( vanduta) 


Cristina

Thứ Sáu, 12 tháng 7, 2013

Quilled Nature Landscape Picture - A Walk Through The Forest

Its been a long while since I quilled  a nature landscape using only basic shapes, so I did this quilled picture of a pathway through the forest. It took me quite a while to make all those basic shapes and create this scene but in the end I liked the way it turned out.

Even though the photograph does not show it, the quilled picture gives a sense of depth and you get the feel you can look into the horizon when you stare into it.

I have used only color to create depth as the shapes are glued flat on the backing. I have used beehive quilled circles as I did in quilled tree landscape for the yellow tree in order to differentiate it.

My other,similar landscapes are Water Fall, Sunset & Silhouette, Tree & Water, Flower Fields, and Palm Beach . But I have used different quilling techniques for each one.

For those who are first time visitors , I have done several tutorials on quilling landscapes, some of which are listed below:-
How to Quill a Landscape
Some Basic Shapes Used for Landscapes
How to Blend Colors for Landscapes

I would love to have your feedback.


Fluturi

            O noua intrare in categoria magnetilor pentru frigider. De data aceasta sunt fluturi, marturii pentru un botez.  Fluturii sunt din hartie pe suport de carton si au dimensiunile de 9cm x 8cm .Pentru comenzi ma puteti contacta la nr. 0721709171 sau pe adresa de e-mail cristina.pdg@gmail.com.

Pret : 10 lei / buc (discount la cantitate mare)


Happy Quilling!
Cristina

Thứ Năm, 11 tháng 7, 2013

Trandafiri

     Trandafiri in ghiveci, un tablou care merge atat pentru birou cat si  pentru acasa.  Poate fi  si un frumos cadou pentru prieteni sau rude.  Rama tabloului este din carton si are dimensiunile de 13cm x 21,5cm.  Pentru comenzi ma puteti contacta la tel . 0721709171 sau la adresa de e-mail  cristina.pdg@gmail.com

Pret : 45 lei


Happy Quilling!

Cristina

Thứ Sáu, 5 tháng 7, 2013

Quilled 3D Picture Frame- Swallowtail Butterfly Among Flowers

During my one and a quarter year journey through quilling , I have been quilling butterflies of all shapes, sizes and colors. This  Goliath swallowtail is one of my butterfly frames.  I have just done some grass and flowers  so the frame does not look bare.

The butterfly has been mounted at a higher elevation than the flowers, I have used basic shapes and have followed the vein layout of the butterfly wings as closely as possible on order to get it to look realistic but did not attempt the tiger stripes since I had not figured out how to get the black and white inside a single veined section at that time.

I have made 4 wings and then glued the lower part of the wings on top of the upper wings. Take a closer look


In order to get the body, I have quilled pegs and shaped them like a swallowtails, and then cut black and glued it on the body.

I have quilled butterflies quite successfully before with my butterfly tree  for which I quilled the monarch following the wing sections very closely as you can see in the close up.  For butterfly garden I quilled a stylized butterfly to fit the whimsical look of that frame with no reference to reality!! ... lets call it artistic license !!!

Then for Butterfly  Heart, I only used beehive quilling for the wings and finally for Lilac & Butterflies I graphic quilled the butterflies. So in my long journey with quilling butterflies I have tried all methods. But wait.... I have another method in store for a later post!!

Hope you like this one.

Labels

abstract art Accessories Adult English AGNES ALIEN AMIGURUMI amirugumi Animale Art AVES Awards Baby baby crochet Baby learn bag Ballet Bun Cover BARRIO SESAMO basic shapes Bead beehive quilling belts Bijuterii Birds Blog Hop BLUSAS books Botez bracelet BUHO Butterfly CABALLO CACHECOL cake candles card Cards cartoon CASACO INFANTI CASAQUINHO EM CROCHE CERDO CHAPEU Christmas Christmas quilling clay COCO coloring CONEJO CORDERO Coronite Craciun Craft crochet crochet pattern Crosetate cross stitch CUERPO BASICO Curtain Cutii Decoupage Doll Dolls - Búp bê drawing Drawing - Vẽ dress Dulciuri 3D earring Easter edging Eggs ELEFANTE Embroidery Embroidery - Thêu Events EXTRATERRESTRE fabric Felicitari Felt FINN Floral arrangements - Cắm và bó hoa Flori 3D flower frame flowers crochet Flowers crochet - Móc hoa Folding boxes - Gấp hộp Folding paper food Funny GALLINA Gang tay - Tất garden GATO Ghivece Giầy - Dép Gifts Gói quà - gấp nơ Gối cho bé GRÁFICOS Graphic Quilling Halloween Hats - Mũ holiday crafts Home decor - Trang trí nhà ICE AGE Insect Invitatii Jesus Jesus Christ Jewelry kirigami knitting knitting pattern knot Knot - Tết dây La multi ani Làm đẹp làm đồ chơi từ gỗ landscape Lectii Quilling Macrame Magazine Magneti Frigider making flowers Making toys MARIPOSA Martie Martisoare Marturii Botez Marturii Nunta MEUS TRABALHOS MI VILLANO FAVORITO Miniaturi Móc đường riềm Móc khăn trải bàn MONSTRUO MUEBLES Multi-strip MUÑECA Nature Scenery necklace Nghệ thuật Nghệ thuật cắt giấy Nghệ thuật vẽ trên kính Nhà đẹp Nunta Origami Ornamente brad OSO Oua Pachwork painting Painting - Sơn màu PAJARO Paper Paper Art paper cut Paper Flowers Paste Patchwork PATRONES PERSONAJES Pillows - Gối plastic Play and learn for baby POLLO poncho Quilled animals quilled art quilled berries Quilled design quilled flowers quilled hollow egg quilled leaves Quilled petal Quilled Picture quilled portrait Quilling 3D Quilling paper Reciclabile recycling rings Scarves - Khăn Semne de carte sewing sewing detail shawls silhouette SILLA snood Snowflake sweater tablecloths Tablouri Targuri Handmade TIEMPO DE AVENTURA tips TRICO Tutorial Tutorial video Tutoriale typography Valentine's Day Valentines Day vector art Video weaving Wedding Wreath