Chủ Nhật, 30 tháng 12, 2012

Quilled Typography quilled words - New Year Wishes


My final offering for the year is this quilled new year greetings to all my followers and friends. I have posted a couple  of quilled typography or quilled words before . My first attempt at quilling  letters was called "Divine" which came out rather nicely and then I followed it up with 'Chris" for which I used my own method.

For this one I have used simple graphic quilling in which I have become quite proficient. Hence I used the rather  intricate looking Baroque Script which font I downloaded free off the net. I am quite fond of curly script and have used strips folded in half  to create the outline font.

I have bordered it with squares with galaxy centers. You can find the instructions on how to make them , here. I think they look far better than the usual squares with coil centers. I put in the rose as the last bit of space was inadequate for a square so I needed to do something to fill the space. I'm quite proud of the way it turned out. It looks rather like a yummy cake!! Well someone who makes cakes can try out this design too!!

In the new year may you

Always remember to forget
The troubles that passed away
But never forget to remember
The blessings that come each day

May joy and peace surround you
Contentment latch your door
And happiness be with you now
And bless you evermore


 Thank you all for warming my heart with all your kind and wonderful comments. I hope you will continue to travel with me through the coming years and to all those who drop by, please join me and journey with me and together we will all discover all that is thrilling about quilling.

Thứ Hai, 24 tháng 12, 2012

Quilled Picture Papercut Nativity Scene

To complete my christmas quilling, I thought this quilled picture of the nativity of Christ was appropriate. As usual I have combined paper cutting with quilling.

The first silhouette I tried was a fully quilled sunset scene which I called "Sunset & Silhouette". For this one, I thought I'd not complicate it, so I did a paper cut. I have used beehive quilling for the background which is slightly different from the one used in  "Reindeer in the Snow".


Hope you like this one . Tutorial for advanced beehive quilling is here.

And Now..........

All my blessings and good wishes to you and your wonderful family.
 May Jesus' coming this year once again bring joy to your home.
 Merry Christmas to you and your loved ones.
Big Bear Hugggg,

Chris

Thứ Bảy, 22 tháng 12, 2012

Christmas Quilling - Quilled Holly Mat

A simple quilled mat of holly leaves  and berries  dedicated to all my Friends, Followers, Visitors and Passers by .


Irish Christmas Blessing 


May the road rise to meet you
May the wind be always at your back
May the warm rays of sun fall upon your home
and may the hand of a friend always be near

May God be with you and bless you;
May you see your children's children.
May you be poor in misfortune,
Rich in blessings.

May you leave this page with a cheer in your heart,

And may you know nothing but happiness
From this day forward.


Thứ Ba, 18 tháng 12, 2012

Quilled Picture Papercut Silhouette - Reindeer in the Snow

I have combined paper cutting and quilling for this quilled picture, Reindeer in the Snow, for which I have used only beehive quilling as a background. Usually, the paper cut is mounted on a paper backing but I wanted to make it a bit different, so whats better than using beehive quilling to depict a snowy backdrop?

For tips on beehive quilling check out my tutorial, which is for those who already know the basic beehive technique.

This one was very simple, I got a couple of silhouettes of reindeer and Photoshopped the design and then cut it out with a craft knife. Then I covered the backing paper with beehive quilling. I have used two variations of the beehive. The border is made of the variation I introduced in filigree flower .  The beehive variation is given in the Filigree Poinsettia Tutorial.

The snow backdrop for the center is the usual beehive quilling pasted closely, taking care not to allow it to unwind too much. When glued close it looks really good and can be used for background filling.

Enjoy and be motivated.

Thứ Hai, 17 tháng 12, 2012

Tutorial Coronite de Craciun

         Asa cum v-am promis, am facut si tutorialul pentru coronitele de Craciun care v-au placut atat de mult. Sunt usor de facut, va trebuie doar rabdare si timp. Asa arata coronita de Craciun gata terminata:


Materialele necesare :


   - Un inel din polistiren sau plastic sau chiar din hartie
   - Carton imprimat de 200g 
   - Lipici
   - Hartie colorata de 130g pentru decorat , fasii de quilling
   - Funda
   - Glitter cu lipici si glitter pulbere 
   - Clopotei de plastic, conuri de brad , margele, 

Cum se face:


Pentru aceasta coronita, eu am folosit un inel de polistiren de 23 cm cumparat de la Casa Retro cu 5lei


           Pentru a acoperi inelul am folosit carton imprimat de 200 g cumparat tot de la Casa Retro la pretul de 28 lei setul . Putin cam scump pentru buzunarul meu, asa ca m-am gandit sa fac putina economie si am utilizat si coli de carton colorat de 130g. Am ales o nuanta care sa se asorteze cu cartonul imprimat si ca sa nu fie simplu, am facut cateva buline  cu  vopsea acrilica gold metalizat. Am facut acelasi lucru si la celelalte coronite iar rezultatul a fost peste asteptari, nici nu realizezi ca nu este carton imprimat.
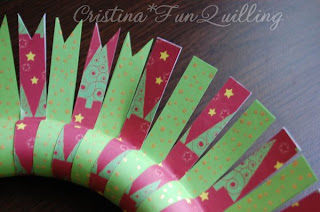
          Am taiat cartonul in benzi de 15mm x 22cm . Mi-au intrat cam 24 -25 de benzi din fiecare model de carton.


    Am lipit benzile de carton pe inel si intre ele , alternand modelul, cate una din fiecare culoare.


 La final s-ar putea sa veti 2 benzi alaturate din acelasi model, sa nu va faceti griji ca nu arata rau deloc. Eu am ales acele benzi ca punct de reper pentru agatatoare. Deci , cand ati terminat de lipit benzile de carton, coronita voastra va arata astfel:


 Cu o foarfeca , taiati in V capetele benzilor de carton. Incercati sa le taiati aproximativ la acelasi nivel pe toate.

 Cand ati terminat, lasati sa se usuce putin,  inainte sa incepeti sa le ornati. Coronite acoperite cu hartie vor avea dimensiunea de 35 cm.


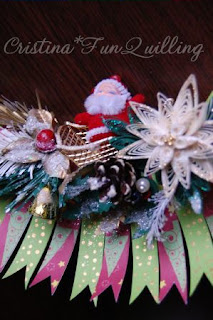
     Pentru ornat, puteti folosi ce aveti prin casa, sau cei mai indemanatici pot face singuri ornametele. Eu am combinat. Am pus prima data agatatoarea si funda rosie. Am facut floarea si cateva frunze din quilling, cateva crengute de brad din hartie franjurata, am lipit  frunze perforate si  fulgi perforati  , apoi am adaugat cateva ornamente de la cornonite mai vechi ,  printre care un con de brad si un mos craciun pe sanie. La final am dat cu glitter irizant si glitter frost peste care am pus un praf de glitter alb.La final arata cam asa :


Pe cei care vor folosi acest tutorial , ii rog respectos sa acorde credit si sa creeze un link catre aceasta postare. Mult spor la creat si happy quilling!

Cristina


Thứ Sáu, 14 tháng 12, 2012

Christmas Quilling- Quilled Stained Glass Window

Now for a change!! A quilled picture of the Nativity of Christ. A quilled mosaic stained glass window design using only beehive quilling, quilled like a mat.

If you hold it up, the light comes through just like a stained glass window; the reason for using beehive. Looks rather holy ( Just couldn't resist that pun!!).

Well it took me a lot of time to get the beehive quilling stuck one to the other!! Not an easy task at all!! Mother Mary's face had to be redone twice. Would have been much easier to glue it to the backing, but I wanted to try and use clear plastic for the final mounting so the light can come through.

I am happy with the results as it is something unique!! Probably the first time a mosaic design has been quilled!!

Hope you like it too. Should look great on a card too.

Sorry I forgot my how to!!

The steps involved are fairly simple but the task is laborious for someone like me who does not have too much patients!! I basically overlaid a printout with a plastic sheet and shaped the black outline with around 4 strips stuck together for a thick, visible outline and then filled it with beehive quilling ensuring that each sub-coil had glue on the sides. To do this, I basically filled the shape with beehive and then took a tad of glue on a toothpick and poked it between adjacent sub-coils to stick them together. Got them stuck to my fingers many a time, threw out a few in a temper and then managed to complete it somehow. It did get easier with practice though. Just made sure the proportions of the hands were as per the drawing.

I used a towel to hold the beehive coils down till dry after I had that "eureka" moment. Avoid getting the glue on top,but if you do, do not panic. Just wipe it off with a damp napkin before it dries. Keep your fingers clean at all times so keep a damp cloth handy.

For my beehive quilling tips follow this link.

Thứ Tư, 12 tháng 12, 2012

Tutorial Glob Om de Zapada

          Acesta este unul dintre tutorialele pe care le-am pregatit pentru voi de sarbatori. Va voi arata , pentru cei care sunt deja initiati in arta rularii hartiei, cum sa faceti un frumos glob pentru bradul de craciun.
         Veti vedea pt inceput cum vor arata globurile la final ca sa va dau putin elan :)


Materiale necesare  pentru confectionarea globului:

    -  Hartie alba , neagra, portocalie, verde si rosie de 130g
    -  O semisfera de plastic sau o jumatate de glob din polistiren sau un glob de plastic mai vechi
    -  Glitter alb ( sclipici ), glitter cu lipici colorat
    -  10 cm de funda rosie 
    -  10 cm de snur pt agatat globul
    -  Aracet sau orice fel de licpici pentru hartie.

Cum se face:

 Eu am folosit ca baza pentru glob o semisfera de plastic de 8cm, dar puteti folosi si o jumatate de glob de potistiren invelit in plastic ca sa nu se lipeasca hartia de el  sau  un glob vechi de plastic.


 Inveliti semisfera in benzi de hartie ca in imaginea de mai jos, asfel globul va avea mai multa siguranta. Eu am lucrat cu benzi de hartie de 3mm.


 Pentru glob, am folosit aceeasi hartie alba  in benzi de 3 mm pe care am rulat-o prin metoda beehave. Eu am rulat cate 2 benzi odata, deoarece nu am avut hartie de 130g si am folosit hartie alba de scris de 100g.
Hartia odata rulata, am strans-o intre degete cat de mult am putut deoarece  am vrut ca globul sa fie cat mai compact fara prea multe gauri. Nu stiu exact cate benzi de hartie au intrat pentru o jumatate de glob, totul depinde de cat de strans lucrati.


Faceti cat mai multe benzi stranse , atunci cand le veti lipi intre ele , va merge mai repede daca nu pierdeti timpul la confectionarea lor. Lipiti benzile rulate, una langa alta cat mai strans pozibil , pe semisfera de plastic.


Incercati sa nu lasati spatiu intre ele ca odata terminat , globul sa arate ca un bulgare de zapada. Jumatatea de glob acoperita cu hartie rulata va arata astfel:


Cand ati terminat 2 jumatati de glob, acoperiti-le pe interior cu un strat de aracet combinat cu putina apa  , sa nu fie prea gros  sau cu lipici in strat subtire daca nu aveti aracet. Luati o pensula si intindeti aracetul fara sa presati pra mult ca sa nu deformati globul. Lasati sa se usuce bine inainte de a trece la urmatoarea operatie.


 Cand cele 2 jumatati sunt complet uscate, lipiti-le intre ele cat mai strans posibil , insa aveti grija sa nu deformati globul printr-o presare prea puternica. La final el va arata astfel:


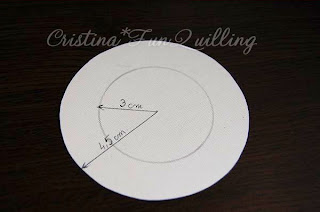
  Acum sa trecem la confectionarea palariei. Veti avea nevoie de carton negru de 200 sau 220g (negru pentru El sau rosu pentru Ea)  si un compas. Trasati un cerc cu raza de 4,5 cm si unul cu raza de 3cm , din acelasi punct.


 Decupati cercul mare cu foarfeca sau orice fel de cutter aveti, apoi cu grija pe cel din interior, spun cu grija deoarece acela va fi capacul palariei asa ca sa nu il deformati prea tare. Aveti nevoie de cate 2 cercuri din fiecare. Pentru calota palariei decupati o banda de hartie de  4,5 cm x 17,5 cm. Trasati pe lugime, pe fiecare parte cate o linie la 5mm de la margine,aceea va fi parte indoita care va fi lipita,  apoi cu o foarfeca zimtata taiati cat mai aproape de margine. Daca nu aveti puteti folosi o foarfeca normala si taiati sub forma de zig zag. Partile decupate vor arata astfel:


 Lipiti banda de 17 cm  la capat si introduceti-o pe unul din cercuri.


  Indoiti partea zimtata de la unul din capete spre exterior si lipiti-o de cerc .


Apoi puneti lipici pe toata suprafata  si adaugati cel de al doilea cerc peste si presati pana se lipeste bine.


 Indoiti partea zimtata  de la celalalt capat spre interior si puneti lipici pe zimti


 Acoperiti cu unul dintre cercurile mici. Presati putin pana se lipeste. Palaria incepe sa prinda forma .


 Intoarceti palaria si introduceti snurul care va agata globul in pom pe gaura deja existenta de la compas. Eu am largit-o putin ca sa incapa. Pe snurul innodat am lipit o banda ingusta de gartie peste nod ca sa il pot lipi de capacac. Adaugati lipici pe toata suprafata si lipiti cel de al doilea cerc mic.


 Pe exteriorul palariei am pus glitter cu lipici negru pe care l-am intis bine pe toata suprafata. Nu va impacientati daca palaria are imperfectiuni, odata acoperita cu glitter nu se vor mai vedea.


 Lasati sa se usuce foarte bine ca sa o puteti orna. Odata uscata palaria capata un luciu mat iar glitterul nu iese prea mult in evidenta. Pentru ornat, am folosit cateva funze din hartie pe care le-am taiat cu perforatorul cu model. Cei care nu au pot taia frunzele cu foarfeca. Puteti adauga dupa imaginatie cateva piese in plus. Cteva frunze din quilling, perle, sau orice doriti.


Odata ornata, am folosit putin glitter alb pulbere ca sa arate ca si cum ar fi ninsa. La final  palaria arata astfel:


Sa trecem la asamblarea globului. Lipiti globul de palarie.


Pentru nas  aveti nevoie de 2 benzi 3mm de hartie portocalie, iar pentru ochi de  2 benzi de 3mm  hartie neagra taiata pe lung.

Lipiti nasul si ochii de cap.


Pentru gura eu am folosit confetti negre facute cu un perforator obisnuit.


Lasati sa se usuce putin si folosind acelasi glitter negru  pe care l-ati folosit la palarie , acoperiti ochii si gura.


 Globul este gata. Eu am facut un El si o Ea, caci parea prea singur mititelul. La final , globurile au o dimensiune de 10 - 12 cm cu palarie cu tot.


Sper ca v-a placut tutorial meu. 
Pe cei care vor folosi acest tutorial , ii rog respectos sa acorde credit si sa creeze un link catre aceasta postare. Mult spor la creat si happy quilling!

Cristina

 ***   Tutoriale pentru metoda Beehave :
           - Beehave by Susan
           - Beehave video tutorial by Pritesh

Labels

abstract art Accessories Adult English AGNES ALIEN AMIGURUMI amirugumi Animale Art AVES Awards Baby baby crochet Baby learn bag Ballet Bun Cover BARRIO SESAMO basic shapes Bead beehive quilling belts Bijuterii Birds Blog Hop BLUSAS books Botez bracelet BUHO Butterfly CABALLO CACHECOL cake candles card Cards cartoon CASACO INFANTI CASAQUINHO EM CROCHE CERDO CHAPEU Christmas Christmas quilling clay COCO coloring CONEJO CORDERO Coronite Craciun Craft crochet crochet pattern Crosetate cross stitch CUERPO BASICO Curtain Cutii Decoupage Doll Dolls - Búp bê drawing Drawing - Vẽ dress Dulciuri 3D earring Easter edging Eggs ELEFANTE Embroidery Embroidery - Thêu Events EXTRATERRESTRE fabric Felicitari Felt FINN Floral arrangements - Cắm và bó hoa Flori 3D flower frame flowers crochet Flowers crochet - Móc hoa Folding boxes - Gấp hộp Folding paper food Funny GALLINA Gang tay - Tất garden GATO Ghivece Giầy - Dép Gifts Gói quà - gấp nơ Gối cho bé GRÁFICOS Graphic Quilling Halloween Hats - Mũ holiday crafts Home decor - Trang trí nhà ICE AGE Insect Invitatii Jesus Jesus Christ Jewelry kirigami knitting knitting pattern knot Knot - Tết dây La multi ani Làm đẹp làm đồ chơi từ gỗ landscape Lectii Quilling Macrame Magazine Magneti Frigider making flowers Making toys MARIPOSA Martie Martisoare Marturii Botez Marturii Nunta MEUS TRABALHOS MI VILLANO FAVORITO Miniaturi Móc đường riềm Móc khăn trải bàn MONSTRUO MUEBLES Multi-strip MUÑECA Nature Scenery necklace Nghệ thuật Nghệ thuật cắt giấy Nghệ thuật vẽ trên kính Nhà đẹp Nunta Origami Ornamente brad OSO Oua Pachwork painting Painting - Sơn màu PAJARO Paper Paper Art paper cut Paper Flowers Paste Patchwork PATRONES PERSONAJES Pillows - Gối plastic Play and learn for baby POLLO poncho Quilled animals quilled art quilled berries Quilled design quilled flowers quilled hollow egg quilled leaves Quilled petal Quilled Picture quilled portrait Quilling 3D Quilling paper Reciclabile recycling rings Scarves - Khăn Semne de carte sewing sewing detail shawls silhouette SILLA snood Snowflake sweater tablecloths Tablouri Targuri Handmade TIEMPO DE AVENTURA tips TRICO Tutorial Tutorial video Tutoriale typography Valentine's Day Valentines Day vector art Video weaving Wedding Wreath