Thứ Sáu, 30 tháng 11, 2012

Felicitari pentru Sarbatorile de Iarna

               Desigur, nu puteau lipsi felicitarile de iarna. Anul acesta , din lipsa de timp, am ales  doar un singur model nou , iar restul , le-am facut dupa stilul favoritei mele Neli Beneva , ador tot ceea ce face. Stilul ei de lucru deja a prins pe toti pasionatii de quilling.
               Pentru realizarea felicitarilor, am ales carton rosu si verde de 220 g, m-am gandit ca merge mai bine si e in tonul Craciunului, dar puteti lucra foarte bine pe orice culoare. Pe cateva felicitari o sa vedeti o floare care mi-a placut foarte mult  si nu am rezistat sa nu o fac si eu. Modelul este creat de Susan ,  iar coronita ei este superba.  Sper sa va inspire si pe voi si desigur sa va placa felicitarile mele.
               Va doresc tuturor un weekend cat mai placut si va astept la ultimele targuri de anul acesta organizate de I Love Handmade , la Piata Universitatii , in curtea Palatului Sutu.
Targurile au loc in data de 1-2 Decembrie si 22 -23 Decembrie. Va stept cu drag!
                La multi ani  celor ce poarta numele de Andrei sau Andreea!


Thứ Ba, 27 tháng 11, 2012

Pregatiri pentru Trargurile de Iarna " I love Handmade "

          Se apropie targurile de iarna " I love Handmade". 1- 2 Decembrie si 22 - 23 Decembrie , dupa cum stiti , in curtea Palatului Sutu, la Universitate.
          Anul acesta m-am axat mai mult pe ornamente miniaturi , cu care  am avut un succes enorm anul trecut, sper sa mearga si anul acesta la fel de bine. Am refacut stocul de ingerasi si de mosi si am adaugat  3 miniaturi noi, un pinguin si un om de zapada pe schiuri ( de mult vroiam sa le incerc) si faimosii reni. M -am inspirat din pozele gasite pe net, nu stiu autorul , asa ca daca cineva isi recunoaste ideile , sa-mi spuna si acord credit de autor. Oricum eu nu am respectat modelul initial si l-am modificat dupa plac. Renii mei au figuri de handicapati :) dar imi plac de mor.
          Sper sa va placa noul meu stoc de ornamente si sa va inspire si pe voi.


Thứ Bảy, 24 tháng 11, 2012

New Quilling Technique Tutorial - Quilled Pine Cones

As promised, here is a new technique quilling tutorial for making quilled pine cones to be used as Christmas decor or Christmas table decor. I have not seen a tutorial for making quilled pine cones so this is probably the only one on the net at this point of time.

Why quill pine cones?? Well, I think real ones are too heavy and bulky to be used for quilled decor . It is also a challenge to quill  nature, and what is Christmas without pine cones!!

Step 1

 Make 32  isosceles triangles using 5.5 to 6', 3mm strips and curve the top as shown above. You can use whatever number is appropriate for the size you are aiming at.


Step 2
 Tear 6, 1/2 inch 3mm strips,
 8, 3/4'  3mm strips
8,  1'  3mm strips
6,  1 1/4'  3mm strips
and 4,   1 1/2 ' 3mm strips
You may vary the lengths to suite your requirement.

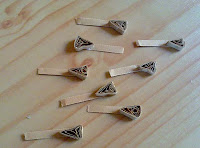
Step 3
 Glue the isosceles triangles to the strips as shown above

Step 4
Curl the strips by scoring the nail of your thumb against the side of the strip. Note the direction of the curl

Step 5
 Now paste the petals as shown above so that it curls inwards, to make a flower.  You should make about 5 flowers as per the strips you tore in step 2's instructions.


Step 6
 Place each flower on a semi soft surface ( I used foam) face downs as shown.

Step 7
 Now using the end of a brush, rub in circular motion so that it curls up and outwards as shown, leaving a small center.

Step 8
 Repeat for all flowers which should look like the above once completed. Note that the whole triangle is visible from the outside.

Step 9
Now apply glue to an 8 petalled flower as shown and glue it inside a 6 petalled flower which has the shortest petals. Note that the flowers should be glued in the order of increasing petal lengths, so that each set of petals peak out over the previous set. When you glue, it should be glued so the petals come out like a cone. You may need only to apply glue to the side of the strips.

Step 10
Make sure it looks like this, with the inner flower's petals peaking from between the outer flower's petals.

Step 11
Continue to glue till you get a nice cone shape as shown above making sure the number of petals reduce for the top layers and your done.