Thứ Sáu, 28 tháng 9, 2012

New Quilling Technique - Outline Flowers with Multi/ Single Strips

This Quilling tutorial is on quilling outline flowers using scallop strips as per my tutorial with either single or multi strip. These flowers can be used for graphic quilling or to create valentine hearts like my Kiddy Valentine.
This saves the hazzle of quilling each petal separately and pasting. Furthermore, it is very stable once the glue dries and holds the shape well unless you squash it too much.


SINGLE STRIP FLOWER
 Make a scalloped strip as per my tutorial here. first scallop should be long enough to make a circle and glue. The other scallops should be long enough to make petals with.


Now make a circle around a cylindrical object like a pencil and glue it. 


 Apply a tad of glue to the next  fold. Apply to the mountain fold side. ( when you fold paper one side is called the valley side the other side will be the mountain side).
  Paste it to the circle as shown above.The distance is determined by the no of petals you require. If you can achieve outdistance you will get a perfect flower. ( the circle is the most stable geometrical shape in nature as you know).


 Continue the same procedure till you come to the last petal. Cut a bit beyond the fold as shown above and apply glue to the mountain and the underside of the extra bit anf glue it to the circlr and the adjoining petal.


You're done!! shape the circle by inserting a pencil and get the flower into proper shape.


MULTI-STRIP FLOWER

 Prepare a scalloped multi strip as shown above. This flowers is going to be made without a centre.
 Apply glue to the mountain fold side as shown above but apply to both sides and not on the fold itself  as you are going to paste petal to petal'

Glue as shown to create the petal.Continue the process glueing the petals around till you complete the flower. You will need to arrange the petals into a circle and glue as in the flowers below. If required apply a tad of glue to the center to hold all the petals together.

Thứ Tư, 26 tháng 9, 2012

New Quilling Technique Tutorial - Perfect Coils My Way

This quilling tutorial is on how to make proper standardised well uncoiled coils.

Like all rookie quillers, I have been struggling to make standard size quills which unwind well and despite the sizing guide, I usually fail miserably!! So I came up with my invention and the above are the results using cut magazine strips!! Wow!! I'm thrilled and it is so simple a child could have thought of it!!

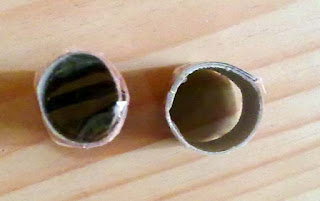
That"s it folks!! Just two tubes, where the longer tube just fits inside the shorter tube and is pushed up and down like a piston!!. The longer tube has to be capped so guess what? I used cello tape. Looks crude but does the job.

How To Make It
Just cut 2, 1' (outer tube)and 2' (inner tube) strips of card  board or thick paper  the length, 50% longer than the diameter of your desired coil.

The outer tube's diameter will depend on quilling strip length, so take the different lengths you usually use and make a good coil with each length. The outer cylinder's diameter should be this size.

The inner cylinder should be slightly longer ,and fit snugly inside the outer tube and around 2 inches in height max.

Roll the cardboard strip to the diameter desired and cello tape it around. Do the same for the inner tube  but cover the top of the inner tube with cello tape as well. You should be able to slide it smoothly inside the outer cylinder by pushing with the ball of your finger. That's It. Your perfect coils tool.

 How to Use
Insert the capped, longer cylinder into the shorter cylinder and pull it 6mm below the rim. Now wind your strip on a quilling tool or toothpick and twist 1/4 turn anticlockwise and remove from the tool. Flatten the top ( if not you coil will string out like a cone) and drop it into the cylinder so that it sits on the capped inner cylinder as shown and unwinds to the rim. If it does not unwind, just place the ball of your thumb so that it gently touches the top of the coil and twist the tool anti-clockwise to get it to unwind. You can remove the coil by holding the outer cylinder between your thumb and forefinger and the pushing the inner cylinder up with your other hand till the coil is pushed into your fingers. Then glue it!!

Always think of the science behind the art and you can figure things out!! That is my motto.

So why do the last 2-3 layers unwind more??  Simple, the inner coils are held in shape longer as you wind and get more tension. So if you want the outer part to uncoil less, just hold the coil gently after you have finished winding for a count of 3 or more depending on the paper you use, after the whole strip is wound. .

Thứ Hai, 24 tháng 9, 2012

BLUSA LILÁS EM TRICO PARA MENINA


Achado na Web, mas só de olhar da prá fazer. 

CASAQUINHO COM APLICAÇÕES DE FLORES


Mais um casaquinho para servir de inspiração.

CASAQUINHO MANGA 3/4 COM GRÁFICO

]


 Um casaquinho gracioso  para as tardes frescas da primavera.
 O gráfico do colar está em postagens antigas.

CASAQUINHO DE CROCHE PARA MENINA COM GRAFICO


AMIGURUMIS CORUJA, CACHORRO E ELEFANTE


BLUSA DE CROCHE EM TELA COM APLICAÇÕES


Quilled-3d -Flowers- Pansy Paradise

I quilled these flowers a bit differently though it is based on husking, since I wanted to make them look real.The yellow part of the petal is husked but I have pinched the top so it looks like a V like the  grass in the tree landscape. for the blue part I did not husk as I needed some width at the bottom as well so it could be stuck on top of the yellow, so I made it like in this tutorial which  is here, but I did not encircle them. Just stuck them at the bottom so it expands out  like a V but still had width .


I Used the same zig zag fold technique for the white, but did not pinch to top so as to get loops. I did try the pinched zig zag for the purple flower, but I feel the blue and white one looks better.

The small flowers are very basic but I made them with stems and arranged like a flower arrangement. I find the Japanese, who do really fantastic quilling, tend to do it this way. However the leaves are of three different types.The tutorial for leaf sprig next to the pansy is here.

For the ladybird, I used a 3d cap, which I managed to shape because I allowed it to unwind about a mm. I usually allow a teeny unwind before gluing, which makes pushing out the shape easier.

Thứ Bảy, 22 tháng 9, 2012

Quilling Tutorial - Multi / Single Strip Scallops

This tutorial is on how to make scallops with multi strips and single strips. I have used multi strip scallops as edging in my Kiddy Valentine. This is suitable for use as edgings in cards and quilled pictures.

Multi Strip Scallop
METHOD
 Take about 6 to 8 strips and paste them together at one and then curl all the strips by running your thumb nail along the side of the strips or by rolling the strips.


 Measure 1' or whatever length you want the scallop to be, along the curve of the inner most strip and hold all the strips together as shown above between the thumb and forefinger, then gently push the top strips forward with your forefinger. Pull the other strips  one by one with your other hand  to different lengths to curve in between the 1st and last strips.
If you want standard height for the scallop, you can measure the top most strip to a length to more than 1 inch eg. 1.2'  and push the top strip forward with your forefinger to meet the 1' mark of the bottom strip, then pull the other strips one by one to different lengths. ( the difference between the top and bottom lengths will be the height of your scallop).
Glue all the strips at one point. Use a thin  wet brush to apply the glue. Dilute the glue slightly and apply with the very tip of the brush the glue it.
Continue the process to the length you want.
If you want to curve the edging more, remember that the height of the scallop needs to be more to give allowance for the curvature. Try to understand the physics behind what you are doing and it will be easy as pie!!
Use the natural curve you created at the start and do not pull the last strip too taut if you want a curled edging.

If you want to straighten the edging then you can make it with the last strip pulled taut or you can take the curled scallop and fold it to a valley fold at each point where all the strips are pasted .
If instructions look a bit confusing just look at the pics and you can figure it out.


Single Strip Scallop
METHOD

I made these single strip scallops to make the yellow outline flowers in the Kiddy Valentine piece.
Pinch and make sharp folds at equal intervals on a strip of your choosing. All folds should be mountain folds as shown above.
Now take a thin cylindrical object; a thin handled paint brush or toothpick would do.
Now starting at one mountain fold, put the strip on your forefinger as shown, roll the brush handle hard against your finger upto the adjacent mountain fold.
This will curve into a scallop.
Repeat the procedure from each fold to the next fold and you have your scalloped strip.


Thứ Ba, 18 tháng 9, 2012

Crochet Manatee Bart


Crochet Manatee

Written by Teresa Richardson

Video Tutorial:  
Crochet Manatee

Video Tutorial: Crochet Manatee Left Hand Version

Skill Level - Intermediate

Abbreviations
DC - Double Crochet
HDC - Half Double Crochet
CH - Chain
SL ST - Slip Stitch


Materials
Size G/4.25 mm crochet hook
4 ply yarn
Tapestry Needle


Chain 3 Join.
Round 1: Work 9 HDC through the chain, 3 SC through the chain, join.
You will want a yarn marker to identify the first stitch on each round.
Round 2: Work 1 SC in each stitch around, ( 12 single crochet total)
Round 3: Working in the loop behind the stitch, work  SC in each loop around.  This will create a lip around the snout.  You don't have to create it this way and can work regular single crochet.
Working in the continual round.
Round 4: 1SC, 1SC, 2SC, 1SC, 2SC, 1SC, 2SC, 1 SC in each of next 5,  ( 15 single crochet total)
Round 5: Work 1 SC in each stitch around  ( 15 single crochet total)
Round 6:  1 SC in each of the next 5, work 2 SC in each of the next 10 stitches ( 25 single crochet total)
Round 7-9: Work 1 SC in each stitch around ( 25 single crochet total)
Round 10: Work 1 SC in each of the next 8 stitches, 2SC, 1SC, 2SC, 1SC, 2SC, 1SC, 2SC, work 1SC in each of the next 9 stitches.
Round 11-20: work 1 SC in each stitch around ( 29 single crochet total)

This is a good time to work on the eyes and snout while we still have access to the inside.
Eyes Chain 3, join, sew to attach.

Round 21:  Work 1 SC in each of the next 10 stitches,  1 SC DEC, 1 SC,  1 SC DEC, 1 SC,  1 SC DEC, 1 SC, 1 SC DEC, work 1 SC in each of the next 8 stitches.  ( 25 single crochet total)
Round 22: Work 1 SC in each stitch around. ( 25 single crochet total)
Round 23: Work 1 SC in each of the next 7 stitches,  1 SC DEC, 1 SC,  1 SC DEC, 1 SC,  1 SC DEC, 1 SC, 1 SC DEC, Work 1 SC in each of the next 7 stitches.  ( 21 single crochet total)
Round 24:  Work 1 SC in each stitch around.  ( 21 single crochet total)
You will want to stuff with filling before closing up to tight.
Round 25: Work *SC DEC, 1SC, work 7 times total from * ( 14 single crochet total)
Round 26:  Work 1 SC in each stitch around. ( 14 single crochet total)
Round 27: Work * 1 SC in each of the next 5 stitches, 1 SC DEC, repeat two times total from * ( 12 single crochet total)
Start of the back tail fin
Round 28: Work 1 SC in each stitch around ( 12 single crochet total)
Round 29: *Work 2 SC in next stitch(single crochet increase), work 1 SC, work six times total from*.   (18 single crochet total)
Round 30-35:  Work 1 SC in each stitch around.   (18 single crochet total)
Cut the yarn, extra length, pull through and secure.  Sew the two edges together. 
Optional:  Upon completion, there are points on each side of the fin.  I secured a knot and pulled the corners down to give them a rounded shape.

Side Fin-Make 2:  Attach to the side approximately 12 rounds back from the snout, close to the bottom.
We are working right over the single crochet
Round 1: work 3 single crochet over 3 stitches, turn, work 3 single crochet over 3 for a total of 6
Round 2: *Work 2 SC in same stitch, work 1 SC, complete 3 times total from *. (9 single crochet total)
Round 3-11: Work 1 SC in each stitch around.  (9 single crochet total)


Thứ Hai, 17 tháng 9, 2012

Quilled Papercut Picture- Kiddy Valentine

I love paper cutting as much as I like quilling and wanted to combine the two, so this is what I came up with. I have used multi strip method to create the scallop around the heart. I made simple quilled flowers using the petal shape and I used scallops to make yellow and pink outline flowers.

On hind sight I think I should use longer strips to make the flowers so they will be dense and hold the shape better. I also struggled with getting the scrolls uniform, even though I have the circle template. It always pops out when I try to get it out to glue it. So I have come up with a home remedy which I am experimenting on. I also discovered how to make the petal look like the pic below despite using printer paper.
Will share my discoveries in a later post.

Chủ Nhật, 16 tháng 9, 2012

CHAPEU DE MARGARIDA PARA MINHA PRINCESINHA


 Fiz para minha netinha Beatriz, Ela, uma bonequinha, ficou um encanto.


Labels

abstract art Accessories Adult English AGNES ALIEN AMIGURUMI amirugumi Animale Art AVES Awards Baby baby crochet Baby learn bag Ballet Bun Cover BARRIO SESAMO basic shapes Bead beehive quilling belts Bijuterii Birds Blog Hop BLUSAS books Botez bracelet BUHO Butterfly CABALLO CACHECOL cake candles card Cards cartoon CASACO INFANTI CASAQUINHO EM CROCHE CERDO CHAPEU Christmas Christmas quilling clay COCO coloring CONEJO CORDERO Coronite Craciun Craft crochet crochet pattern Crosetate cross stitch CUERPO BASICO Curtain Cutii Decoupage Doll Dolls - Búp bê drawing Drawing - Vẽ dress Dulciuri 3D earring Easter edging Eggs ELEFANTE Embroidery Embroidery - Thêu Events EXTRATERRESTRE fabric Felicitari Felt FINN Floral arrangements - Cắm và bó hoa Flori 3D flower frame flowers crochet Flowers crochet - Móc hoa Folding boxes - Gấp hộp Folding paper food Funny GALLINA Gang tay - Tất garden GATO Ghivece Giầy - Dép Gifts Gói quà - gấp nơ Gối cho bé GRÁFICOS Graphic Quilling Halloween Hats - Mũ holiday crafts Home decor - Trang trí nhà ICE AGE Insect Invitatii Jesus Jesus Christ Jewelry kirigami knitting knitting pattern knot Knot - Tết dây La multi ani Làm đẹp làm đồ chơi từ gỗ landscape Lectii Quilling Macrame Magazine Magneti Frigider making flowers Making toys MARIPOSA Martie Martisoare Marturii Botez Marturii Nunta MEUS TRABALHOS MI VILLANO FAVORITO Miniaturi Móc đường riềm Móc khăn trải bàn MONSTRUO MUEBLES Multi-strip MUÑECA Nature Scenery necklace Nghệ thuật Nghệ thuật cắt giấy Nghệ thuật vẽ trên kính Nhà đẹp Nunta Origami Ornamente brad OSO Oua Pachwork painting Painting - Sơn màu PAJARO Paper Paper Art paper cut Paper Flowers Paste Patchwork PATRONES PERSONAJES Pillows - Gối plastic Play and learn for baby POLLO poncho Quilled animals quilled art quilled berries Quilled design quilled flowers quilled hollow egg quilled leaves Quilled petal Quilled Picture quilled portrait Quilling 3D Quilling paper Reciclabile recycling rings Scarves - Khăn Semne de carte sewing sewing detail shawls silhouette SILLA snood Snowflake sweater tablecloths Tablouri Targuri Handmade TIEMPO DE AVENTURA tips TRICO Tutorial Tutorial video Tutoriale typography Valentine's Day Valentines Day vector art Video weaving Wedding Wreath